Justin Cooney

Web Development Tips and Examples

  • I was taking a look at a SharePoint 2016 Web site and one of the requirements was to have a document library containing a folder hierarchy and then to have the left hand menu bar on the site to allow navigation of the folder structure. In SharePoint the best way to accomplish this sort of navigation is to use the Tree View control. This control continues to be used in later versions of SharePoint and shares the same quirks, one of which is that it isn’t very customizable.

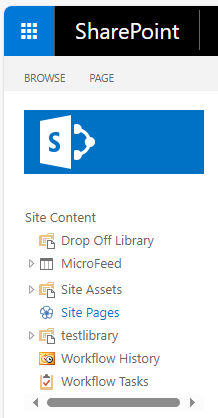
    • As a side note, the Tree View control appears on the left hand menu bar and has the title: Site Content. You can add the Tree View to your site by checking the checkbox under Site Settings -> Look and Feel

    A problem with the SharePoint Tree View control is that it cannot easily be customized. It will show pretty much everything on the site including Site Pages and Site Assets as well as other custom libraries.

    You probably don’t want to expose the more admin-related controls like Site Assets and Pages to your regular users. You can update the security to deny access to regular users, but this doesn’t remove the links to them from the Tree View control. Instead users see the links even if they don’t have access and then get an access denied message when they click the link.

    Solution

    The only way that I’ve found to remove unwanted links from the Tree View control is to this in SharePoint Designer. Specifically, open your site in Designer and select the list you want to hide. Then check the checkbox to Hide from Browser.

    This will remove the link to the list from the Tree View control. The problem is that this is a blanket ‘Hide’ that will remove the link, but also make the control hidden elsewhere on the site such as in Site Contents. You’ll want access at some time to areas such as Site Assets and Site Pages so it’s not so great if they are hidden from view.

    To deal with hidden functions an easy and quick solution is to create an ‘admin‘ list that links to the important admin sections of the site. Basically create a new links list on you site and then add each link that you will hide. That way you’ll still have access to the hidden links even though they are hidden throughout the site. A point to note is that this new links list will show up under the Tree View control so you should give it a descriptive name.

    Summing up

    The steps are:

    1. Create a new list on your site and link to to the controls that you are about to hide
    2. Open your site in Designer and check ‘Hide from Browser’ for the controls to hide

    I found a discussion about this problem on Stack Exchange here:

    https://sharepoint.stackexchange.com/questions/59774/hide-some-lists-from-treeview

  • Recently while I was putting together a HTTP REST call to get some information from SharePoint 2016 (on-premise) document library I ran into some problems with the length of the call. Specifically I got the dreaded:

    The length of the URL for this request exceeds the configures maxUrlLength value.

    That’s the basic problem with HTTP GET, the requests are limited length. This length restriction depends on a combination of factors, but it basically boils down to what the Web server has been set to accept. With SharePoint on-premise it is the maxUrlLength set in the web.config file, and with other software maximum HTTP GET length is similarly set at the server level.

    Most advice says to update the maximum maxUrlLength value for GET requests in the SharePoint web.config file to be larger than it currently is. That’s nice if you are the main SharePoint server admin and have access on the server, but not so great if you are just trying to write a REST query with a path that’s a bit long.

    Other advice says to change your request to HTTP POST. To change your query to HTTP POST rather than HTTP GET needs rewriting and doesn’t really make sense for something that should easily be handled in a HTTP GET request.

    In my case the SharePoint Web server would not accept any requests that were longer than 285 characters long. This was a problem because the document library that I was querying with my REST query was full of nested long named sub-folders, and the documents also had long names. It was just a short matter of time until I ran across a folder path that was too long than the allowed 285 character limit.

    Specifically, I was doing the HTTP GET REST call with the format:

    https://mySharePointSite.com/sites/SubSiteName/DocLibraryName/_api/Web/GetFileByServerRelativeUrl(/sites/SubSiteName/DocLibraryName/Folder1/Folder2/Folder3/FileName.txt)/listItemAllFields/id

    With this verbose syntax mixed with the long folder path there’s no wonder that I was quickly hitting the maximum HTTP GET URL length.

    So what’s the solution? How can we get this query to work without major server changes?

    The answer is to use a URL variable and parameter. The server puts HTTP Max GET request length limits on the base part of the URL itself, but does not apply this restriction to the parameters sent in the URL. Who would have guessed!

    Long story short, we can update the URL example above to put the SharePoint document library file path into a passed parameter. Since the longest part of the HTTP request is the path to the document in the document library we can significantly reduce the GET request size by putting everything in the GetFileByServerRelativeUrl REST function into a URL parameter variable.

    In the URL below see how I’ve added a parameter arbitrarily called @v into the function and then moved the document library path into the URL parameters section of the URL:

    https://mySharePointSite.com/sites/SubSiteName/DocLibraryName/_api/Web/GetFileByServerRelativeUrl(@v)/listItemAllFields/id?@v=/sites/SubSiteName/DocLibraryName/Folder1/Folder2/Folder3/FileName.txt

    One side effect I have found with changing your REST call to using a parameter variable is the way characters such as & are handled. If, for example, there is a & character somewhere in your path and now you move it into a parameter, it will cause an error. This is because the & needs to be URL-escaped when in parameter form (Note that it does not need to be escaped when it is part of the base URL).

    So make sure that if you are using a parameter variable where the path may contain an & character, make sure to replace the & character with its URL escaped code: %26

    To summarize:

    • REST HTTP GET requests are good for quickly and easily getting information
    • HTTP GET requests are limited in the number of characters passed. This is usually set at the server level.
    • HTTP GET requests do not consider parameters passed in the URL as part of the request length maximum
    • You can use URL variables with parameters to snip out long sections of the URL such as the path in a document library. This can let you move long text into the parameters section of the URL where they are not considered part of the GET Request Maximum length restrictions.
    • Escape & characters in the parameter string with the URL code %26
  • Before I go into details, you should know that I got this working using out of the box SharePoint 2016 on-prem running Designer 2013 and using a 2013 Workflow.

    Nothing extra was needed, copying files to different folders can be done with out of the box Designer 2013 workflow features. This was music to my ears since it is important functionality and should not rely on non-stock features.

    Also note that at this time SharePoint online has more modern ‘flows’ using Power Automate and that these will have quite different syntax and functionalities, but in this case I am working with older technologies.

    So all of this is good news if you’re looking at implementing something similar of copying files to folders using a SharePoint designer 2013 workflow. It’s possible out of the box, but just not well documented how to get it to work.

    Read more: SharePoint Designer Workflow Copy File to Folder in the Same Library

    To copy a file in a library from one folder to another folder:

    In SharePoint Designer I pointed to the document library that I was working with. I then started a new workflow. After some looking around, the only option to do a file copy is in Workflow actions, add the action called ‘Update List Item

    Getting this action to copy a file from one folder to another is a bit finicky and isn’t very intuitive to get working. I had to methodically test and write down each of my test cases when I was trying to get it to work and couldn’t find help articles online that worked. 

    In the end the solution was rather simple but not at all obvious. It’s all about the syntax of the path. If you enter it wrong you’ll see any number of errors, the least helpful of which I found to be: 

    The file or folder name contains characters that are not permitted.  Please use a different name.

    The most important point in getting this functionality to work is that the path can’t start with a forward slash. The path format for your destination folder is: 

    sub-folder1/sub-folder2/filename.txt

    So for example, if you have a file and folder structure like this from your library, you’d use this syntax:

    test/subfolder/filename.txt

    This is non-intuitive since in other spots in SharePoint (such as the file upload window), a beginning forward slash is set when specifying a file folder path to upload to.

    Since you are using the ‘path and name’ function you can also change the file name from here when you are specifying the file and path because you are updating the ‘current item’. 

    Steps to Set Up the Folder Copy:

    1. In Workflow actions, add the action called ‘Update List Item’
    2. In the Update List Item popup windows, choose 
    3. List: Current Item
    4. Then click the ‘Add’ button and select to:
    5. Set this field: Path and Name
    6. To this Value: test/subfolder/filename.txt

    Again, a big point to note is that there is no beginning slash in the Path field.

    Some Extra Points

    Here is some extra information that I found helpful while I was debugging my workflow.

    In Designer Studio 2013 I made sure to only have my workflow trigger manually. This is a checkbox that you set on the main workflow configuration page in Designer Studio

    To avoid issues with the workflow looping and triggering itself during the copying testing, I put an ‘if’ condition on the origin folder and file name so that the workflow would only trigger once. The ‘if’ condition looks like this:

    If Current Item:Server Relative URL contains /abc/filename.txt

    You can check the error message and force-stop your workflow instance if there are any issues. You can do this from the library itself. Make sure that you make the workflow column visible in your library. Then when you trigger your workflow on the document this column will show the stage as a click-able link. 

    If there is a problem reported on the workflow status page, there is a click-able ‘i’ button beside the Internal Status. If you click this you’ll see hopefully helpful debugging details.