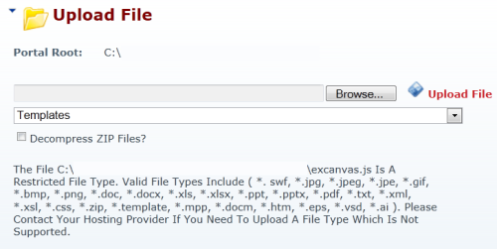
DotNetNuke (DNN) is a good content management system that greatly simplifies the day to day administration and content management of sites. One nice feature is the file management system which allows users to upload files from their local computers to the filesystem on the DNN Web server portal root. They can then use the DNN GUI to add widgets such as the Documents module that provides a fast and simple way to give site visitors access to these files.
The Problem
Sometimes, though, users will encounter a seemingly mysterious error message when they are trying to upload files to DotNetNuke such as the message in the image at the start of this article. This message will say that the file they just tried to upload is a restricted file type and that they need to contact a hosting provider.
You and your users will be happy to hear that this warning looks more ominous than it really is. If you are in charge of the DotNetNuke installation then you may have heard of disallowed file type errors before.
Tracking Down the Issue
When speaking with the user who does not explain the specifics of the error they encountered, there are two possibilities that will immediately spring to mind when hearing about an error with the DotNetNuke file uploader.
- The first is that the file size exceeded the permitted file size in DotNetNuke.
- The second is that the file type is not a permitted type.
You should make sure to check both of these points while talking with the user and make sure that when you enable the file type, that the file size will not exceed that allowed by your installation of DotNetNuke.
Luckily it’s quite easy to update the list of permitted file types in DotNetNuke
Here are the steps to update the list of allowed file types based on a DNN 5.01 installation that I am working with. Depending on your version of DotNetNuke, the path and procedure to manage the list of file types may differ.
- Log into DotNetNuke with your SuperUser level account.
- Click on the Host option on the top left toolbar
- Click on the Host Settings menu item under the Basic Features menu.
- Scroll to the bottom of the Host Settings page that appears
- You will see an Advanced Settings sub-section
- Click on the plus (+) beside the Other Settings option to expand this
- You will now see a number of options, one of which is titled Allowable File Extensions
- In the text box of Allowable File Extensions you will see a comma-separated list of the allowed extensions.
- At the end of the list add the file extension you would like to enable. Please note that you do not add the ‘.’ in front of the extension, but simply a comma and then the actual file extension (such as ,ai for Adobe Illustrator file types, or ,docx for MS Word documents)
Do Not Over-Allow File Types
The reason that DotNetNuke restricts file types so carefully and only allows system SuperUsers to manage the list of file types is that some file types are more prone to allowing system compromises than others.
While managing file types, it is important to realize that each new file type that you add can introduce security risks to your site. On a closed Intranet system this is not so much of an issue, but on an Web site that is exposed to the Internet you should carefully evaluate the allowed file types to make sure that you are not exposing your site and users to unnecessary risks.

Leave a comment